Tubeless tires have revolutionized the biking world, offering improved performance, reduced weight, and fewer flats. However, even with their advantages, punctures can still occur. Learning how to fix a puncture on a tubeless tire is a valuable skill for any cyclist.
In this comprehensive guide, we’ll walk you through the step-by-step process of repairing a puncture on a tubeless tire. Ensuring you’re back on the road quickly and safely.
Understanding Tubeless Tire Anatomy
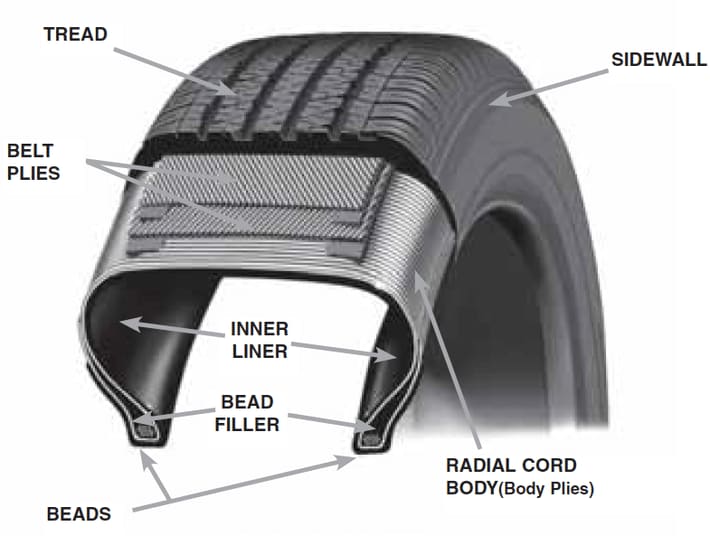
Before diving into the repair process, it’s essential to understand the basic anatomy of a tubeless tire. Unlike traditional tires, tubeless tires feature an airtight seal between the tire and the rim. Eliminating the need for an inner tube. Instead, a special sealant is used to seal punctures and maintain air pressure.
Tubeless tires have become increasingly popular in the cycling world for their improved performance. Reduced weight, and enhanced puncture resistance compared to traditional tubed tires. To fully appreciate the benefits of tubeless tires and effectively maintain them, it’s essential to understand their anatomy. Let’s delve into the key components of tubeless tire construction:
Mastering the Art of Tubeless Tire Puncture Repair: A Step-by-Step Guide

Bead: The bead is the inner edge of the tire that sits snugly against the rim. In tubeless tires, the bead is designed to form an airtight seal with the rim, preventing air from escaping. This tight seal is crucial for maintaining consistent tire pressure and preventing flats.
Casing: The casing is the foundation of the tire, providing structure and support. In tubeless tires, the casing is typically made of layers of fabric or rubber-coated cords. That are sandwiched between the tread and the bead. A robust casing enhances durability and helps resist punctures.
Sealant: One of the defining features of tubeless tires is the use of sealant. This liquid solution is added to the tire before inflation and serves multiple purposes. First and foremost, sealant helps seal small punctures and leaks as they occur. Preventing air from escaping and maintaining tire pressure. Additionally, sealant can help lubricate the tire bead, making it easier to seat the tire on the rim.
Tread: The tread is the outermost layer of the tire that comes into contact with the road surface. It is typically made of a durable rubber compound designed to provide traction, grip, and durability. In tubeless tires, the tread may feature specialized patterns and compounds optimized for various riding conditions. Such as wet weather, off-road trails, or smooth pavement.
Sidewall: The sidewall of the tire connects the bead to the tread and provides additional protection and support. In tubeless tires, the sidewall is often reinforced with extra layers of material to enhance puncture resistance and durability. Additionally, the sidewall may feature branding, sizing information, and other markings.
Gather Your Tools and Materials
To repair a puncture on a tubeless tire, you’ll need a few essential tools and materials:

- Tubeless tire repair kit
- Tire levers
- Air compressor or portable pump
- Bucket of water (optional, for locating leaks)
Locate the Puncture :
Begin by visually inspecting the tire to locate the puncture. Look for any obvious signs of damage, such as nails, screws, or sharp objects embedded in the tread. If the puncture is not immediately visible. You may need to inflate the tire and listen for the sound of escaping air. Submerge it in water to locate the leak.
Remove the Tire :
Once you’ve located the puncture, it’s time to remove the tire from the rim. Use tire levers to carefully pry the tire bead away from the rim. Working your way around the entire circumference of the tire until it is loose enough to remove by hand.
Insert the Repair Plug :
With the tire removed, use a reaming tool from your repair kit to clean and enlarge the puncture hole slightly. Next thread a repair plug onto the insertion tool. And carefully insert it into the puncture hole until only a small portion of the plug remains visible.
Reinstall the Tire and Inflate :
Once the repair plug is in place, carefully reinstall the tire onto the rim. Ensuring that the bead is seated properly. Use an air compressor or portable pump to inflate the tire to the recommended pressure. Then check for any signs of leakage.
Monitor and Maintain :
After repairing a puncture on a tubeless tire. It’s essential to monitor the tire for any signs of air loss or further damage. Additionally, periodically check the tire’s air pressure to ensure it remains at the recommended level for optimal performance and safety.
Understanding the anatomy of tubeless tires is essential for cyclists looking to maximize performance, durability. And safety on the road or trail. By knowing how each component works together to create an airtight seal and provide reliable traction. Cyclists can make informed decisions about tire selection, maintenance, and repair, ensuring a smooth and enjoyable riding experience.
Conclusion :
Repairing a puncture on a tubeless tire may seem daunting at first. But with the right tools and know-how. It’s a straightforward process that any cyclist can master. By following the steps outlined in this guide and taking proper precautions. You can keep your tubeless tires rolling smoothly mile after mile. Confident in your ability to handle unexpected flats on the road.

